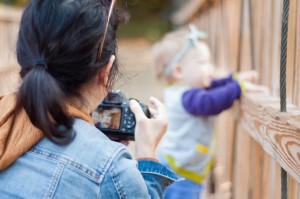
By Smarty Guest Blogger Anna Mesen, Charlotte Camera Moms. Contact her for online and in-person classes at info@charlottecameramoms.com
Welcome!
If you’re reading this that means that you are tired of having your camera always stuck in Auto mode. I often tell people wanting to learn photography that if you are going to use your DSLR in Auto mode, you might as well just use your camera phone instead. When your DSLR is always in Auto, you are not taking advantage of the benefits of a DSLR, but still lugging around the extra weight!
Switching to Manual Mode means that YOU are in control of the photos you take. Manual mode is the optimum setting to use on your DSLR camera. While a single blog post won’t cover all the ins and outs of using your camera in Manual mode, these hints and tips are meant to help you give you a little ”nudge” in that direction.
*Please note: I refer to the DSLR, but these tips also work for the mirrorless camera as well
Big Ideas
1. Lighting, Lighting, lighting
2. Try out Aperture Priority Mode
3. Focus is Key
4. Consider your Perspective
5. Edit!
6. Consider the Age of Your Subject
1. Lighting
If you only learn 1 of the big 6 ideas listed above, this one is the most important. Your lighting will make or break every single one of your photographs. Great lighting trumps everything… I mean everything. Even if you have the most adorable subject in the world (your kiddo of course) in the most amazing location ever; bad lighting will ruin your photos.
You need enough light
You cannot expect to get a beautiful photograph inside your house on a rainy day with all the curtains drawn. You just can’t. If you don’t have enough light to properly expose your photographs then all your efforts will be for nothing. What’s the fix??? When shooting indoors, open those blinds and curtains and move your subject in front of a window (or even better yet, a sliding door or french doors). Even better than that, get outside! That’s where all the pretty light is anyway!
Look for soft, even light
While you do need enough light, not all light is “good light.” Harsh, overhead light from a midday sun can kill a photo. It creates harsh shadows and gives your subject squinty eyes. Ever wondered why your photos of the kids on the beach in the middle or the day in July don’t turn out so great? The sun is killing your photo! The Fix?? Find some open shade (under a beach umbrella or canopy) and consider shooting at a different time of day. The early morning after sunrise or evening before sunset are optimal times to photograph (photographers refer to these times of day as the “golden hour”).
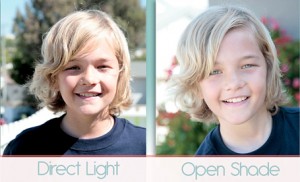
Harsh Light Versus Even, Soft Light – Photo Credit
2. Aperture Priority Mode
Aperture Priority Mode is a middle ground between fully Manual mode and Auto mode. It is by far superior to Auto mode, so while you may not be ready for fully manual just yet, Aperture Priority is a good baby step up.
What is Aperture?
Changing your aperture (also known as F-STOP) changes the size of the opening in your lens, therefore controlling the amount of light you let into your camera. This can be really helpful in helping more light filter into your camera if you’re in a situation where you lack light. But there is also another really cool side effect of changing your aperture; it creates that soft, dreamy, blurry background that you see so often in portraits taken by professional photographers.
Here’s How To Do It
Set your camera to Aperture Priority mode. That’s the “A” (Nikon) or Av (Canon) on the wheel on the top of your camera… Yay! You’re no longer in Auto mode! Now figure out how to change the aperture. You may have to consult your manual for this one, as all cameras are slightly different, but it’s usually the small wheel on the front of the camera. Turn your aperture to the lowest number possible. This means the lens is open as wide open as it can go. With this setting you are letting in the maximum amount of light. Simultaneously, you are also creating a shallow depth of field which means you are blurring the background behind your subject.

Blurry background using a “wide open” aperture Photo Credit: Anna Mesen
3. Focus
Getting sharp focus in the right area of your photo is key. It’s basically the only element of a photograph that can NOT be tweaked in an editing program. Once the photo is taken, you’ve either nailed focus or you haven’t.
In Auto mode your camera makes all the decisions about focus for you. Once off Auto (you should be in Aperture Priority now), you get to make the decisions about where you want your camera to focus. You’ll need to consult your manual for this one, because this is going to vary widely according to cameras. However, it’s important to make sure your camera is on Single Point Focus (Nikon) or Manual AF Point (Canon). This means you will have one highlighted dot that you can see when looking in your viewfinder. You can toggle this highlighted dot to be placed directly over where you want the main focus of your photo to be located. (Hint: in a close up portrait, move the focus point over the eye closest to you).

Focus on the Eye, Photo Credit: Anna Mesen
4. Change your position
Don’t Always Stand
One big thing that differentiates a “snapshot” from a beautiful photograph is the position in which the photographer is standing. Often times snapshots are taken from a standing position. When photographing children, this means that often times snapshots are taken from a slight downward angle and isn’t always the most interesting angle to shoot from.
Change it up
Think about ways to make your perspective more interesting. Get up on a chair and shoot directly down or do the exact opposite and lay on the floor to get an eye level shot of your subject. Also try getting in close to capture small details as well as standing back to capture the whole scene. The point is, try out different angles and positions, don’t be content to just “stand and click.” You will be amazed how just being aware of your perspective and positioning will improve the quality of your photos.
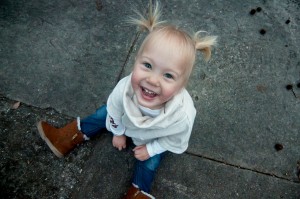
Shot from Above, Photo Credit: Anna Mesen
Edit your photos!
Don’t be intimidated
Don’t worry… you don’t have to be a Photoshop wiz to do this successfully. Most laptops come with their very own editing programs built right in. This is all you need. If you don’t have that, then consider this link with information on many free/low cost editing programs.
Start Small
Don’t get overwhelmed as editing programs can offer a ton of options for editing in the form of sliders and tools. Start by using just a few of the options available to you. For instance, cropping, exposure, and white balance are a great way to start. Play around with your editing program until you get comfortable with these tools and then try out a few more. You’ll be surprised how much you learn just by playing around.
6. Ages and Stages
I. Newborn
Use a professional. I know, probably a little contradictory to the whole point of this informational booklet. However, getting a professional to document this happy yet exhausting and emotional time is so important. You, of course, will take many photos in addition, but you won’t regret hiring a professional.
Don’t use props or try to pose your newborn. Leave the props and poses to the professional. Let your photographer know that’s what you want and she will do that for you (if that’s her style), but don’t try this on your own. These photographs look easy to do, but they are very hard to do right and can end up looking hilariously awkward if you’re not careful. Instead, focus on capturing the real moments…baby snuggled in daddy’s arms, baby sleeping in his or her crib, big sister giving the baby kisses.
Use window light. Newborns are by far the most portable, so take advantage of that. If the baby is sleeping peacefully in the swing in a dark corner of the room then move the swing near a window before you shoot.
II. Baby
Shoot from above. If your baby is not sitting up yet, lay the baby on a blanket (make sure you’ve placed your baby close to a window for light!) and shoot from directly above. This is an easy, go to technique that I use often.
Don’t forget to document those firsts (sitting up, walking, eating solid foods)! You will be happy you have those memories documented later. Hint: Because you never know when this might happen, don’t worry if you don’t have your camera on you for the actual exact moment. Just keep it close by and be sure to get a photo at some point soon after they successfully learn a new skill.
III. Toddler
Ah, the toddler. In my opinion, the trickiest phase of all to photograph. My strongest advice in this stage is DO NOT TRY TO POSE. Ever ask a toddler to go stand by that tree, put one arm around it, stand still, and smile??? It will never, ever, ever happen.
Instead, just let the child do his or her own thing. I promise you will get far better results and everyone will be much happier if you let your toddler just be and shoot according to their terms rather than trying to direct and pose.
This means you need to be ready to move. Get down on the ground, run to get around to the front of your toddler, climb up on a chair. It seriously should feel like a workout after you’re done!
IIII. Child
Give your child the opportunity to get involved and have some say in the photos you take of them. Getting “buy in” from your child is key and will help eliminate some of the battles. Here are a couple ideas…
– Let them have some control. (i.e. “I want to take some photos of you today. Would you like to pick out your clothes/choose an activity you’d like to do/decide where you would like to go?”)
Incorporate a fun activity. (i.e. “I want to take some photos of you today. Would you like to go to the zoo/go to the pool/go to the skate park for me to get some photos?”)
Let them see the results! Often times, photos sit on our computer never to be seen. If you want your child motivated for the next time you’d like to take photos of them, then let them see the outcome of your recent shooting. Better yet, let them have a say in which ones you print and hang on your wall.
As with any skill, the best way to get better is to practice. This means go out and shot! The more photos you take the better you will get…. Happy shooting!
![]()
 Anna Mesen is a Charlotte, NC based child and family photographer who enjoys sharing her passion for photography by teaching other moms how to take beautiful photos of their children. In fact, she can often be found photographing her own two-year-old daughter, documenting moments that pass so quickly. You can visit her website at Charlotte Camera Moms.
![]()

