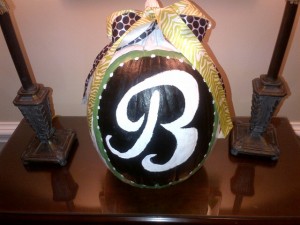
My kids have cut me a major break this year with Halloween. Clay is going to be a ninja, sporting the same costume his cousin wore last year (his idea). Ella James wants to be a black cat. Finally, I get to mash the easy button!
Since they did me a solid and I didn’t have to scramble for obscure and costly costumes, I had some time to pimp my pumpkin, Pinterest style. (pumpkin from a parking lot and not a farm.)
I do not love carving a pumpkin. I do, however, love the way pumpkins look when they are carved, all lit up at night. However, it’s a lot of work so my husband is chief carver and my job is to critique his work. Know your role, right?
I’m crushing on painted pumpkins because it’s more evergreen than a carved one (you might see this one on my foyer table waaay past Halloween) and it’s moderately easy. I am super proud of myself and my arm hurts a tiny bit from patting myself on the back. My husband helped a little bit by doing the polka dots and touching up the “B”, which he said looked fuzzy from far away…what-the-hell-ever that means?
If I can do this, I know you can do it better, Smarties! Here’s what I did.
1. Spray paint the pumpkin with high gloss white paint. I did one coat and didn’t bother doing the very bottom. Who’s going to see that anyway?
2. Draw a large circle with a black sharpie and fill in the circle using a paintbrush and black acrylic paint.
3. Draw another circle around your black circle, leaving a few inches of space, and fill in the space with acrylic paint. I chose green.
4. Choose a font in Microsoft Word and change the font size until it fills an entire page. Once you get it large enough, print it out. You’re going to use this as a template to look at while you freehand the letter. You can also Google “letter stencils”and print one that you like.
5. Using a white paint pen (or a small paintbrush and white acrylic paint if you don’t have a paint pin, like I didn’t), draw a thin version of your letter. Then, fill it in with a paintbrush and white acrylic paint.
6. Next, add some white dots. Start with a dot at the top and bottom and on each side and then start filling dots in between so that they are evenly spaced. (this was my husband’s idea, which was Super Smarty, because I would have started at 12 o’clock and gone clockwise and they would’ve ended up a mess…DUH)
7. Finally, add some ribbon (I got some at Michael’s) and you have a Smarty Pumpkin Masterpiece!
Tip: Use a hairdryer to dry the paint if you are like me and have zero patience.
![]()
Don’t forget to sign up for our EIGHT days of Fall Fashion Giveaways! Over $2,000 worth of Smarty Swag! 
Day 1: Win a pair of Livie & Luca Shoes!
Day 2: Pick ANY piece from the Elizabeth McKay Fall Collection!
Day 3: TWO lucky Smarties will win a $500 Shopping Spree at Gretchen Scott Designs!
Day 4: Win a $100 gift certificate at Southern Tide, perfect for your hubby!
Day 5: You get your Smarty Pick from fab designer, Jude Connally!
Day 6: Your Smarty Pick of Erin McDermott’s amazing jewelry!
Day 7: Your favorite TWO Ella B. Charlotte Neighborhood soy candles!
Day 8: A 3-pack of Gina Made It Headbands, valued at $72!


1 comment
very impressed! we have yet to carve a pumpkin here. hoping to eek out another year without have to. shh. maybe we should have painted instead!